Overcome problems of traditional layers
Autor
Vahid Cheshmy
Software Developer
bei SYZYGY Techsolutions
Lesedauer
5 Minuten
Publiziert
20. Oktober 2023

Most of us are familiar with clean architecture, nowadays, this approach called traditional layered architecture. But this approach comes with challenges. Some of these challenges can be mitigated by the vertical slice architecture. In this post I present the vertical slice architecture using an example implementation in .NET 8.

Introduction
Most of us are familiar with clean architecture, nowadays, this approach called traditional layered architecture.
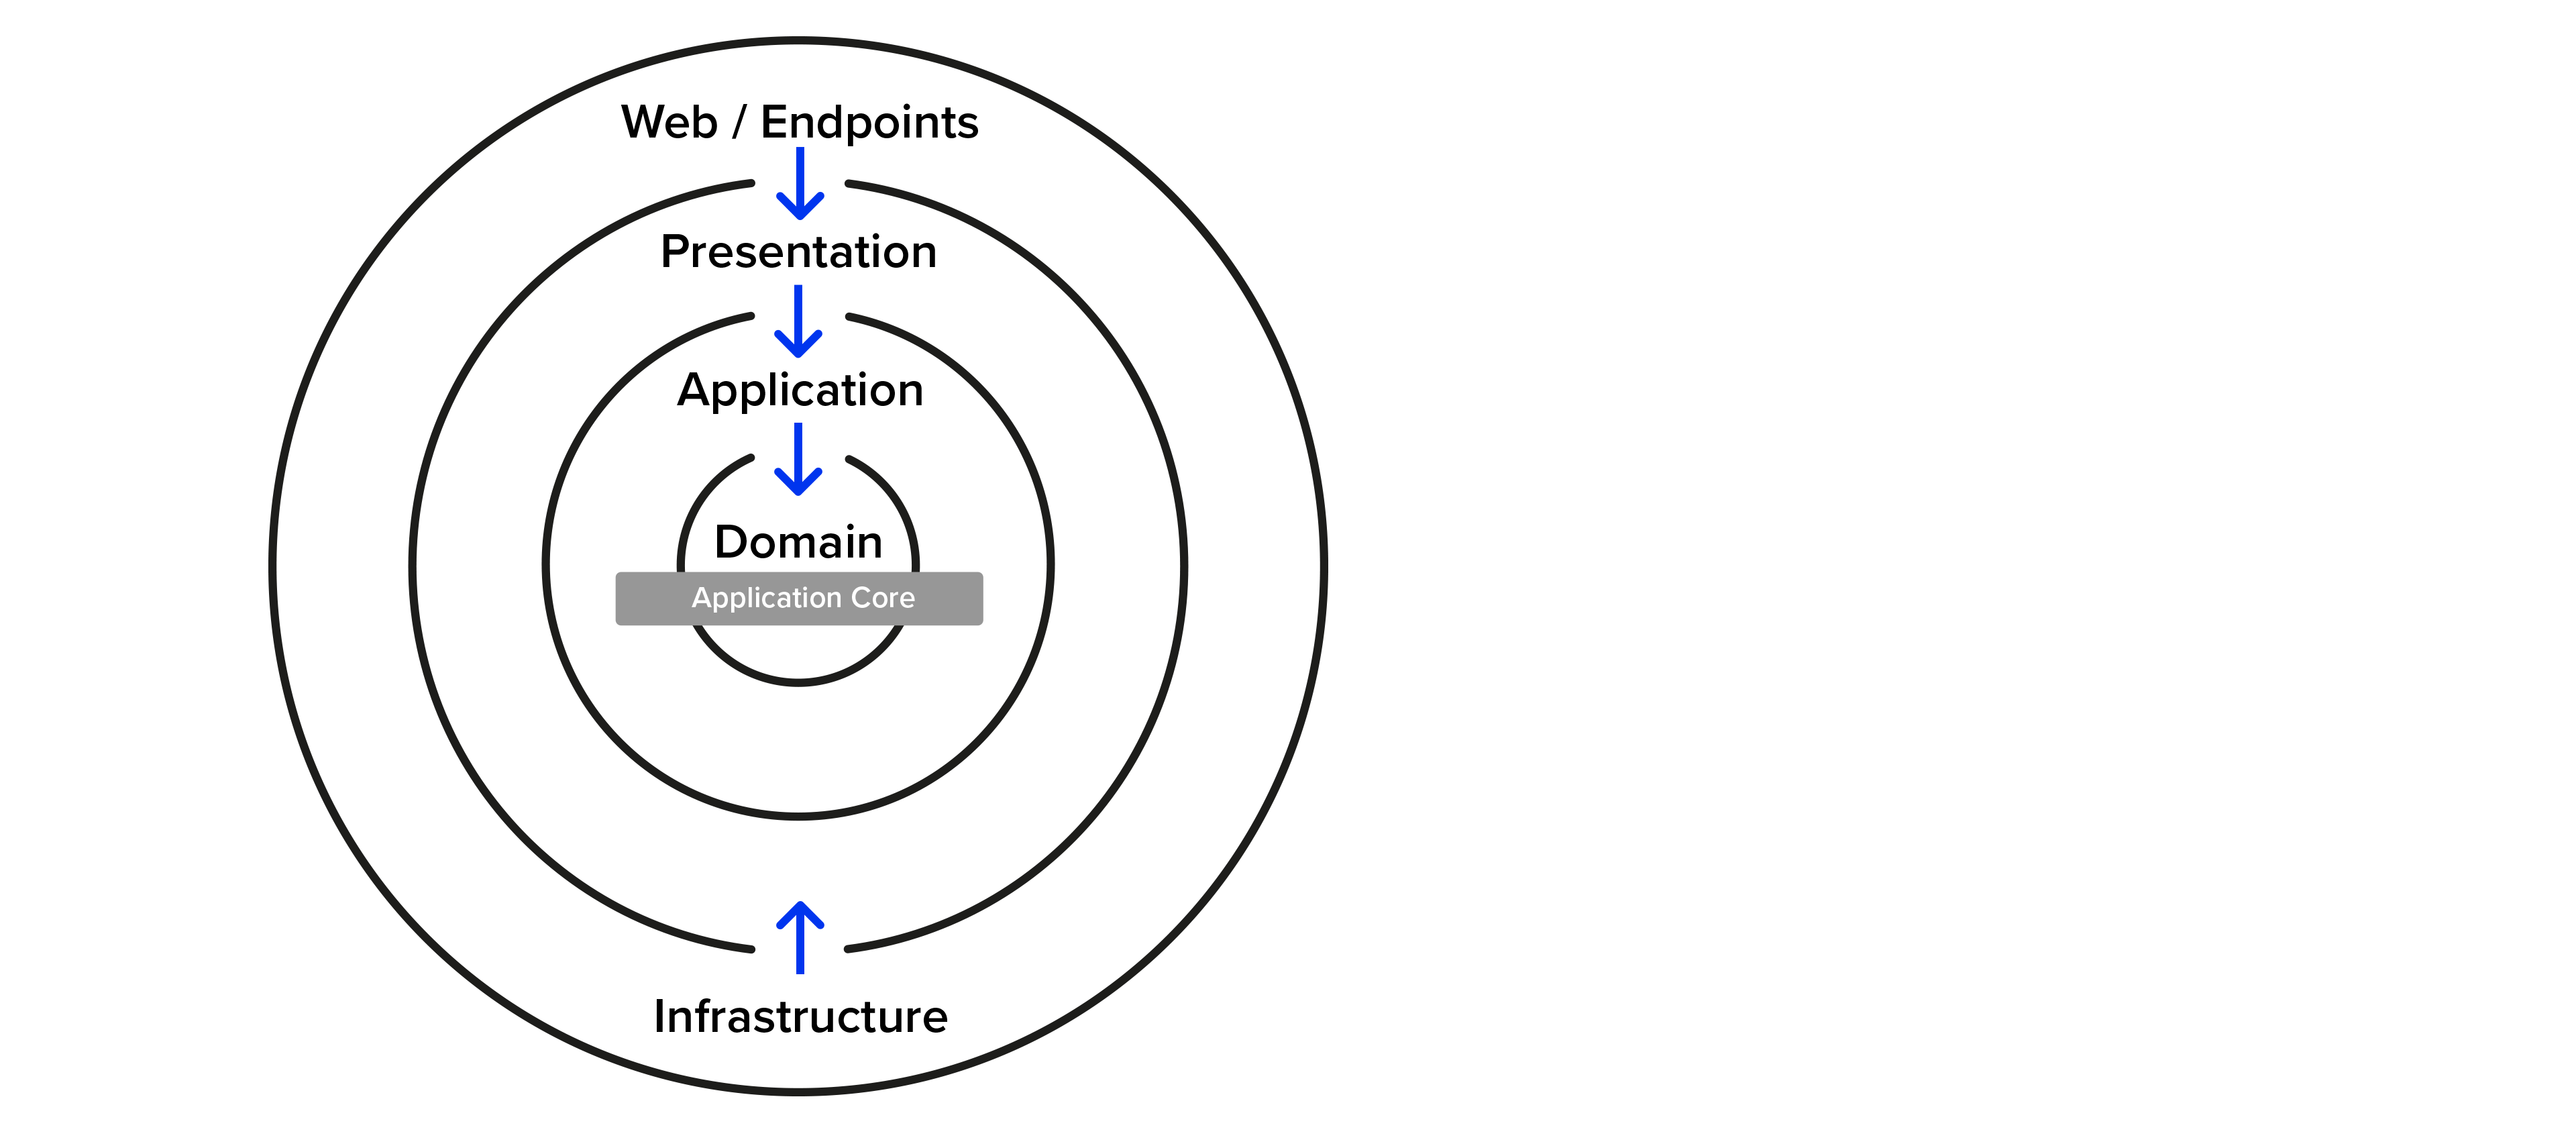
A traditional layered or onion architecture organizes code based on technical concerns in different layers. In this approach, each layer has individual responsibility in the system.
The layers then depend on each other, and they can collaborate with each other.
In web applications, the following layers might apply:
- Presentation
- Application
- Domain
- Infrastructure

Onion architecture
Traditional layered architecture problems
- Highly coupled to the layers, it depends on, and the maintainability will be difficult
- Parallel changing between developers might be difficult, that means by changing different parts, application might be broken.
Vertical Slice Architecture
A vertical slice architecture is an architectural pattern that organize code by features instead of technical patterns.

Vertical Slice Architecture
As you can see in the picture, the idea of vertical slice architecture is about grouping the code based on business functionalities, and it will put all relevant codes together.
In layered architecture the goal is to think about horizontal layers but in vertical slice architecture, now we need to think about vertical layers.
In this case we need to put every thing as a feature, that means we don’t need shared layers like repositories, services, infrastructure, and even controllers, we just need to focus on features.
Example API in .NET 8
Now let’s take a look how we can follow this approach, I will create a simple minimal API in .NET 8.
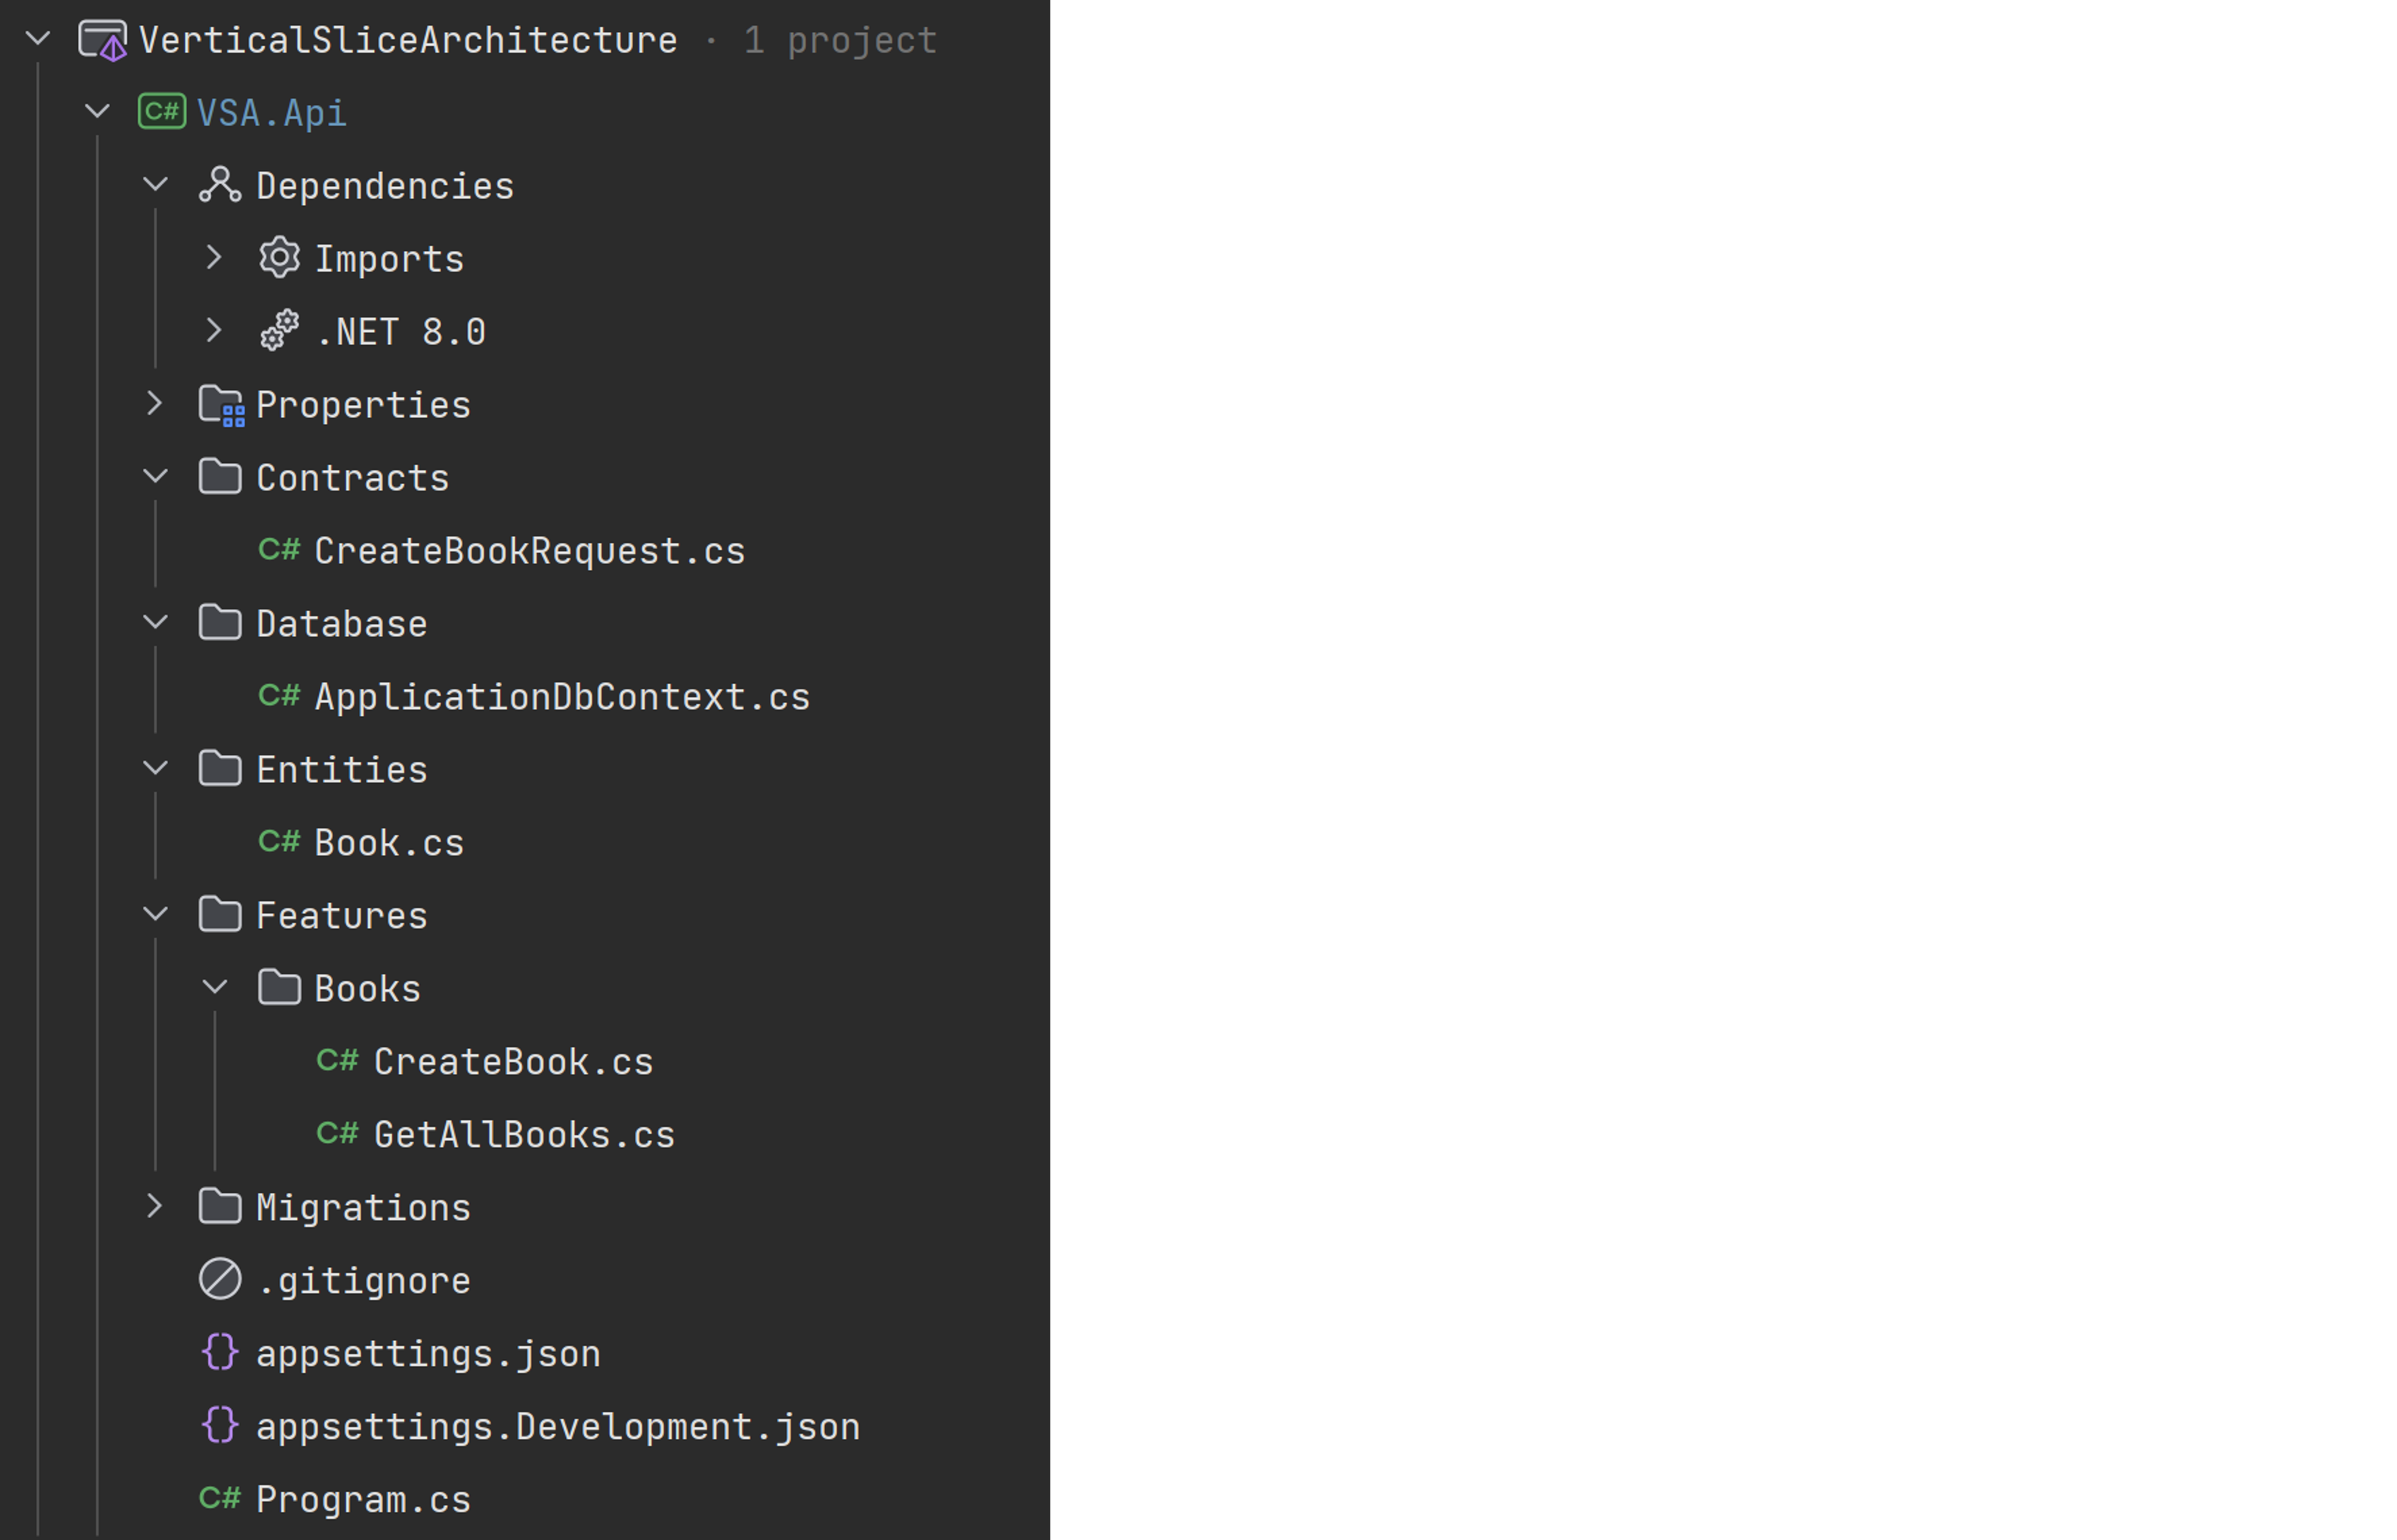
Here our solution will look like:

Vertical Slice Architecture Example
Step 1: Necessary packages
We need to install following packages
dotnet add package MediatR
dotnet add Microsoft.EntityFrameworkCore
dotnet add Microsoft.EntityFrameworkCore.Design
dotnet add Microsoft.EntityFrameworkCore.SqlServer
Step 2: Add entity
Let’s start by creating the entity.
public sealed class Book
{
    public long  Id { get; set; }
    public string Name { get; set; } = string.Empty;
    public string Description { get; set; } = string.Empty;
}
Step 3: Configure DbContext
We need to add the dbContext in database folder
public class ApplicationDbContext:DbContext
{
    public ApplicationDbContext(DbContextOptions<ApplicationDbContext> options):base(options)
    {

    }

    public DbSet<Book> Books { get; set; }
}
Step 4: Configure services and middlewares
It’s time to configure services and also add the middleware in our API
appsettings.Development.json
{
  "Logging": {
    "LogLevel": {
      "Default": "Information",
      "Microsoft.AspNetCore": "Warning"
    }
  },
  "ConnectionStrings": {
    "Database": "Server=localhost;Database=VSA;Integrated Security=true;MultipleActiveResultSets=true;TrustServerCertificate=Yes;"
  }
}
Program.cs
var builder = WebApplication.CreateBuilder(args);
builder.Services.AddDbContext<ApplicationDbContext>(opt =>
{
        opt.UseSqlServer(builder.Configuration.GetConnectionString("Database"));

});
builder.Services.AddMediatR(cfg => cfg.RegisterServicesFromAssembly(typeof(Program).Assembly));
var app = builder.Build();
app.Run();
So, we just registered the dbContext to use SQL server and also registered MediatR service.
Step 5: Create book feature
The next step is to apply the feature in our architecture, in this case we need to separate each feature, in this example I will create a book feature that will create and get all books.
Let’s start with creating the book feature, since I will use MediatR pattern I will adapt CQRS pattern that will segregate query and commands.
public static class CreateBook
{
    public sealed class CreateBookCommand:IRequest<long>
    {
        public string Name { get; set; } = string.Empty;
        public string Description { get; set; } = string.Empty;
    }
    internal sealed class Handler : IRequestHandler<CreateBookCommand, long>
    {
        private readonly ApplicationDbContext _dbContext;

        public Handler(ApplicationDbContext dbContext)
        {
            _dbContext = dbContext;
        }

        public async Task<long> Handle(CreateBookCommand request, CancellationToken cancellationToken)
        {
            var book = new Book
            {
                Name = request.Name,
                Description = request.Description
            };
            await _dbContext.AddAsync(book, cancellationToken);
            await _dbContext.SaveChangesAsync(cancellationToken);
            return book.Id;
        }
    }
    public static void AddEndpoint(this IEndpointRouteBuilder app)
    {

            app.MapPost("api/books", async (CreateBookRequest request, ISender sender) =>
            {
                var bookId = await sender.Send(request);
                return Results.Ok(bookId);
            });
    }
}
Contracts
public class CreateBookRequest
{
    public string Name { get; set; } = string.Empty;
    public string Description { get; set; } = string.Empty;
}
As you can see, we added all feature inside the static class, it will create an input that will use IRequest to create a command, then will add the IRequest to its handler and create the book and finally will add the endpoint to call by the client.
In order to apply the endpoint we need to this middleware in pipeline, simply we can add it in program.cs class.
var app = builder.Build();
CreateBook.AddEndpoint(app);
...
Step 6: Get All books feature
Let’s create a query in order to select all books and return them to the client.
public static class GetAllBooks
{
    public sealed class Query : IRequest<List<Book>>
    {
    }

    internal sealed class QueryHandler : IRequestHandler<Query, List<Book>>
    {
        private readonly ApplicationDbContext _dbContext;

        public QueryHandler(ApplicationDbContext dbContext)
        {
            _dbContext = dbContext;
        }

        public async Task<List<Book>> Handle(Query request, CancellationToken cancellationToken)
            => await _dbContext.Books.ToListAsync(cancellationToken: cancellationToken);
    }

    public static void AddEndpoint(this IEndpointRouteBuilder app)
    {
        app.MapGet("api/books", async (ISender sender) =>
        {
            var books=await sender.Send(new GetAllBooks.Query());
            return Results.Ok(books);
        });
    }
}
Also, we need to add the endpoint in pipeline:
var app = builder.Build();
CreateBook.AddEndpoint(app);
GetAllBooks.AddEndpoint(app);
...
Problem:
As you might see, for each feature we need to add the endpoint middleware, here is another package that we can install and use it to get rid of adding a new middleware.
dotnet add package Carterin order to use the carter, we need to modify the features
CreateBook.cs
public static class CreateBook
{
    public sealed class CreateBookCommand:IRequest<long>
    {
        public string Name { get; set; } = string.Empty;
        public string Description { get; set; } = string.Empty;
    }
    internal sealed class Handler : IRequestHandler<CreateBookCommand, long>
    {
        private readonly ApplicationDbContext _dbContext;

        public Handler(ApplicationDbContext dbContext)
        {
            _dbContext = dbContext;
        }

        public async Task<long> Handle(CreateBookCommand request, CancellationToken cancellationToken)
        {
            var book = new Book
            {
                Name = request.Name,
                Description = request.Description
            };
            await _dbContext.AddAsync(book, cancellationToken);
            await _dbContext.SaveChangesAsync(cancellationToken);
            return book.Id;
        }
    }
}
public class CreateBookEndpoint : ICarterModule
{
    public void AddRoutes(IEndpointRouteBuilder app)
    {
        app.MapPost("api/books", async (CreateBookRequest request, ISender sender) =>
        {
            var bookId = await sender.Send(request);
            return Results.Ok(bookId);
        });
    }
}
GetAllBooks.cs
public static class GetAllBooks
{
    public sealed class Query : IRequest<List<Book>>
    {
    }

    internal sealed class QueryHandler : IRequestHandler<Query, List<Book>>
    {
        private readonly ApplicationDbContext _dbContext;

        public QueryHandler(ApplicationDbContext dbContext)
        {
            _dbContext = dbContext;
        }

        public async Task<List<Book>> Handle(Query request, CancellationToken cancellationToken)
            => await _dbContext.Books.ToListAsync(cancellationToken: cancellationToken);
    }
}
public class GetAllBooksEndpoint : ICarterModule
{
    public void AddRoutes(IEndpointRouteBuilder app)
    {
        app.MapGet("api/books", async (ISender sender) =>
        {
            var books=await sender.Send(new GetAllBooks.Query());
            return Results.Ok(books);
        });
    }
}
and the last step is to register the carter in middleware
var app = builder.Build();
app.MapCarter();
We just need to add the MapCarter middleware in pipeline and that’s it, no need to add new feature in pipeline.
Conclusion
Vertical cuts are an alternative to traditional approaches. They are a good choice, especially in the context of microservices. They adress some of the major drawbacks of clean architecture.
Instead of separating based on technical concerns, Vertical Slices are about focusing on features. By building the system around vertical slices, you can avoid making compromises between cohesion and coupling. This is achieved by keeping a low coupling between vertical slices and high cohesion within the slice. Usually, shared abstractions like services and repositories are not needed.
Wanna give it a try? Happy Coding 🙂

Head of Technology

